Wednesday, July 29, 2009
Test Kitchen #22: Ricotta Gnocchi
Even more puzzling than why I chose to make gnocchi, was that out of all the traditional potato-based recipes and being a HUGE fan of the potato myself, I chose the one recipe that had absolutely no potato in it at all. (For those non-believers, the potato really is an awesome vegetable. Fried, baked, mashed, tots, hashed; it's so versatile. And best of all: potato as soft pillows of pasta-like fluff surrounded in your favorite sauce. There. I've said my peace.) This Ricotta Gnocchi is made primarily with ricotta cheese, grated Parmesan and flour. The original recipe came from the ever popular allrecipes.com. The steps below have only a few adjustments, the biggest being that we ignored the sauce recipe included and just made a giant pot of Dad's homemade sauce.
Ingredients:
1 (8 ounce) container of part skim ricotta cheese
2 eggs
1/2 cup freshly grated Parmesan cheese
1 teaspoon salt
1 teaspoon pepper
1 teaspoon garlic powder
1 cup all-purpose flour, or as needed
handful of shredded mozzarella
Steps:
1. Stir together the ricotta cheese, eggs, Parmesan cheese, salt, pepper, and garlic powder in a large bowl until evenly combined. Mix in 1 cup of flour. Add additional flour if needed to form a soft dough.
2. Divide the dough into 3 or 4 pieces, and roll into 1/2-inch-thick ropes on a floured surface. Cut each rope into 1-inch pieces, and place on a lightly floured baking sheet. Try pressing each piece with the bottom of a fork to give a ridged texture. Place in the refrigerator until ready to use.
3. When your sauce is ready, bring a large pot of lightly salted water to a boil over high heat. Boil the gnocchi until they float to the surface, 1 to 2 minutes, then drain.
4. To assemble the dish, transfer warm gnocchi into a large serving bowl. Ladel some sauce liberally over the top. Stir in the mozzarella cheese.
Verdict:
The dough was very wet and needed more flour to become kneadable, which could have been due to the high amount of humidity in the air on this particular day. Perhaps just another reason why it didn't quite make sense for me to choose this recipe on a hot and sweaty afternoon.
The taste and texture was quite good. Not quite as melt-in-your-mouth as others I've had, but these were also not made with potato, so maybe that's how it should be. The dough was a little sticky and stuck to the edges of my teeth when I took a bite. I also noticed that for the amount of cheese in the recipe, the flavors didn't come through as I expected. If I were to try this one again, I would probably dial up some seasonings and definitely make it on a less humid day. This probably would also be a good dough to try our luck with some homemade ravioli.
While I was still proud of myself for making a pasta from scratch, my sense is that the secret to any great pasta, is mastering the art of the dough. Later that day, Dad emailed that they had whole wheat flour in the cabinet and that we could have tried the recipe using that instead for a healthier option. There will be other afternoons. Let's save it for later on this winter.
P.S. Since Dad was overseeing the production of his excellent sauce, I was left to make the dough and roll little gnocchis on my own. With my hands completely covered in dough, there would be no way for me to prevent Dad from snagging up the camera and taking some video of me for a change. I owe him this one of, I'm sure, many to come. Further witness the evidence of that humid day in my crazy frizzy hair.
Tuesday, July 21, 2009
Test Kitchen #21: Double Chocolate Cookies
Nice try, daddio.
So when I joked that he should cook without me, take pictures and do a write-up for the blog on his own, I didn't really expect him to call me on it. But there it was, in my inbox by 11:35 this morning; a Double Chocolate Cookie article, complete with recipe and pictures.
Jealous, that they were baking while I was working, I replied to his email,"Sniff...Snifff...You soldiered on without me. Are there any left for me to 'test'?" Mom wanted to know if the sniffs in my email was tears or just me trying to smell the cookies all the way from work. Maybe a little bit of both.
Since Kathy was busy this week, Mom decided to take over the test kitchen. Her recipe was for double chocolate cookies. She decided to cut down the amount of chocolate chips in half. They are really good. The recipe makes about 3 dozen cookies.
Double Chocolate Cookies
Ingredients:
About 6 oz. of semi-sweet
chocolate chips divided into two portions
1) Heat oven to 375° (350 degrees with the pans we use)
2) Melt 1/2 the chocolate chips in the microwave for 30 seconds or until melted. Stir and set aside to cool.
3) Beat sugar, butter, and vanilla on medium speed until creamy. Beat in eggs until light and fluffy. Mix in cooled melted chocolate.
4) Mix in flour, cocoa powder, baking soda, and salt on low speed until well blended. Stir in remaining chocolate chips. Using the cookie scooper, place batter on two un-greased cookie sheets about 2 inches apart. (If you don't have a cookie scooper, shape dough into 1-1/4 inch balls.)
- Dad, From the Test Kitchen
Tuesday, July 14, 2009
Test Kitchen #20: Ice Cream Sandwiches
Inspired by the shortbread crust in last week's fruit tart and still having ice cream on the brain, I got the idea to make ice cream sandwiches. By rolling out the dough and cutting circular cookie shapes, I hoped to create cookies that would be firm enough to hold the weight of the ice cream.
We used the same steps and ingredients for the crust from the White Chocolate Fruit Tart, but doubled the recipe to get more cookies. Using a circular cookie cutter that was about 3.75" in diameter yielded about 14 cookies to make 7 total sandwiches.
Never forgetting the photo op, we used a couple of quick tricks to ensure a pretty cookie. Dad dug out an antique metal tin that was filled with Grandpa's cookie cutters. The one we chose to use had a scalloped edge around the outside. Once we cut the cookie dough out, I used a small juice glass, with a diameter about a half inch less than the cutter and lightly pressed it into the dough to make an inner border. For the big finish, Dad pulled out a steak brand in the shape of an "H" that a friend had given him as a gift and we stamped the center of each cookie.
Ingredients & Steps:
- 1 1/2 cup butter, softened
- 1 cup confectioners' sugar
- 3 cups all-purpose flour
- 1 gallon of half fat, Neapolitan Ice Cream
(Chocolate, Vanilla and Strawberry in the same box.)
1. In a small mixing bowl, cream butter and confectioners' sugar until light and fluffy. Gradually add flour; mix well.
2. Cover dough with plastic wrap and refrigerate for 30 minutes.
3. Roll to about 1/8" thick. Cut dough with cookie cutters.
4. Combine scraps of dough and re-roll to make more cookies. Place on cookie sheet lined with parchment paper.
5. Bake at 300° between 28-35 minutes. Transfer to cooling racks and then refrigerate between 45-60 minutes or until firm.
6. When cookies are ready, squeeze the entire gallon of ice cream onto a cutting board. Cut half inch thick slices of ice cream, using the circular cookie cutter to create a round chunk to go in between two cookies.
7. Immediately wrap with plastic wrap or wax paper and place back in the freezer.
The Verdict:
This week's experiment was a clear winner of the Pretty Award. The cookies were good, but could have been a little thinner. There's definitely a magic formula to finding just the right cookies for an ice cream sandwich. Either the cookie is too stiff and snaps in half when you bite into it shooting the ice cream out the other side or the cookie is too soft and you're left with doughy finger prints. (I hate that!)
Unfortunately in this case, the cookie got really hard in the freezer and the ice cream didn't get hard enough. (This might have been because I used the Churn Style ice cream which tends to be a little more creamy.) I left four sandwiches at Mom and Dad's house, who were having the Cohen's over for dinner. I gave two to my friend, Beth, to share with her husband, Joe and Matt and I shared the last one. Matt liked the cookie but, we had to ultimately take the sandwich apart and just eat it open-faced with the ice cream spread on top. I liked using a shortbread style cookie for the sandwich as opposed to the traditional chocolate cookie. We'll just have to work on tweaking the consistency of the dough next time.
Friday, July 10, 2009
Test Kitchen #19: White Chocolate Fruit Tart
Trying to remember how his father, a professional baker, made fruit tarts proved difficult. Dad has a few of Grandpa's cooking notebooks but they are hard to decipher. Written in half English and half German is a list of ingredients and that yields at least ten or so cakes. Grandpa was used to baking in mass quantities. Figuring out how to make just one of something was a different story.
With these lists, no instructions could be found anywhere. I suppose Grandpa didn't need to write down the procedures. He had them all memorized and the notes seemed to serve more as a grocery list than a recipe. If we were lucky, there might be a notation at the end that said something like, "and then bake". That's helpful. What temp? How long? According to Dad, Grandpa didn't really know. He would just watch it and then he just knew when something was ready. When asked how long something should stay in the oven, his reply was, "Til it's done."
So with little wisdom from years past to fall back on, we did we as always do and just figured it out as we went along.
This was really good and I was surprised I liked it as much as I did. The crust is very easy to make and reminded me of a thick shortbread cookie. Dad is used to his father baking a fruit tart so that fruit becomes soft, but I was happier with this version because I just can't like warm, mushy fruit.
If you want the entire recipe, hit the link above at allrecipes.com. We had a few modifications because Dad did not want to use canned fruit and we wanted to utilize what we already had in the house. So instead of instead of pineapple, mandarins and kiwi, we used nectarines, plums and strawberries.
We also cut the amount of white chocolate chips considerably. The recipe calls for an entire 10 oz bag and I think we probably used about a cup or so. I would highly recommend cutting the chocolate. The sweetness in combination with the cream cheese in the icing was just right. It would have been sickeningly sweet if we had used the entire bag of chips.
Since we didn't use the canned pineapple, we didn't have any pineapple juice leftover to make the glaze like the recipe instructs. Instead, we used orange juice and it came out fine. The purpose of the glaze is really just to keep the fruit from turning brown.
Dad's thoughts on the next go around for this recipe were to double the amount of cream cheese, delete all the chocolate, add 2 eggs, some vanilla and sugar. Then bake the whole thing with the fruit on top. I'm not so sure about that last step, but the alterations in the cream cheese filling might make it taste more like a cheese cake, so I'm cool with that.
I really thought Matt would like this one. He always seemed to like fruit desserts, but I found that apparently "fruit" is limited to the apple pie a la mode category only. Fortunately, I was in the mood for one more test and created something different for dinner that night.
Chipotle Chicken Rolls with Avocado Dipping Sauce
Inspired by Rachael Ray: 365 No Repeats
I made a few edits to this because I didn't have ground chicken in the house and had already defrosted the chicken breasts. I also used two avocados instead of one because the dipping sauce was a little too tangy with just the one. The ingredients and steps below is the way that I prepared it.
Ingredients:
1 lb shredded chicken breast
6 scallions, chopped
1 1/2 cups grated sharp cheddar cheese
1 garlic clove, finely chopped
3 tablespoons of chipotle flavored salsa
salt and fresh ground black pepper
8 sheets frozen phyllo dough, defrosted
1 stick unsalted butter, melted
Dipping Sauce
2 ripe Hass avocados
Juice of 3 limes
Handful of fresh cilantro leaves
1 tsp coarse salt
3 Tbsp extra-virgin olive oil
1. Preheat oven to 400.
2. To cook chicken, boil a large pot of water. Submerge raw chicken breasts in boiling water and continue to boil for 15-20 minutes. Times may vary depending on the thickness of the chicken. (I usually just fish them out and slice them through to check. Obviously they're done when there's no more pink.)
3. Place cooked chicken on a cutting board and with two forks, pull the chicken apart until all is shredded.
4. In a bowl, combine shredded chicken, scallions, cheddar cheese, garlic, and chipotle salsa and season with salt and pepper. Squish the ingredients together like you would with a meatloaf. Set aside.
5. In a small sauce pan, melt the unsalted butter. Do not boil.
6. Arrange 1 sheet of phyllo dough with the long side closest to you on a sheet of parchment paper, brush liberally from edge to edge with melted butter, and season with salt and pepper. Place another sheet of phyllo on top, again brush liberally with butter, and season with salt and pepper. Repeat until you have four layers of phyllo.
7. Separate the chicken mixture in half, and with your hands, create a log of chicken sitting along the bottom edge of the phyllo sheet closest to you.
8. Roll the front edge of the phyllo sheet away from you, encasing the chicken mixture. Continue until you have completed a long roll. Tuck the ends in and then brush the entire outside of the phyllo log with more melted butter.
9. Transfer the first log to a rimmed cookie sheet, putting the seam side down. Repeat this process to make a second log with the remaining chicken mixture.
10. Bake 15 minutes or until the log feels firm to the touch.
Dipping Sauce:
While the phyllo-wrapped chicken is in the oven, cut the avocados in half lengthwise, cutting around the pit. Separate the halves and scoop out the pit with a spoon, then use the spoon to scoop the avocado from it's skin. Place the avocado in a food processor and combine with lime juice, cilantro, coarse salt, and about 3 tablespoons of water. Process until avocado mixture is smooth, then stream the olive oil into the dressing. Taste and adjust seasonings.
I actually made the dipping sauce ahead of time at Dad's because they have a food processor and I don't. Having made it, I think it's perfectly fine to make the sauce ahead of time and store it in the fridge until you're ready rather than be rushing around to make it during the baking time. I still have some leftover and it would be a great alternative spread for a turkey sandwich.
After the rolls came out of the oven, we each had a half with a dish of dipping sauce and a side of fat-free re-fried beans. The entire second roll was leftover for each of us to have a half for lunch the next day. Although working with phyllo can be nerve wracking because it's so delicate, this one was a winner that I would do again.
Monday, July 6, 2009
Fourth of July BBQ
What fun is trying out new recipes if you can't use your close friends and family as guinea pigs?! With an adventurous spirit and a couple of inspiring e-mails from my sister, Christine, Dad happily announced that we were having ribs for the Fourth. In my whole life, I don't think we've ever strayed from the traditional holiday standards of hamburgers and hot dogs. Maybe an occasional kielbasa or sausage, but never have we ever tried ribs.
Dad got a recipe from their neighbor, Larry, for a Memphis style dry rub. He seasoned and prepped them the night before the picnic and then, almost in the tradition of Thanksgiving, he got up at 6AM the next morning to put them into the oven. There they slowly baked at 250° for over 8 hours with Dad rotating them every half hour. After all the guests had arrived, he put the ribs on the grill, brushing them with the mop sauce from Larry's recipe (see below). The smell was incredible! All the seasonings working together to create that classic backyard barbecue aroma.
After a short stay on the grill, we offloaded them to a large serving pan and placed them back in the kitchen to complete the buffet line. Rounding out this culinary rodeo were some great barbecue sides dishes like Mom's Mac Salad, Aunt Mary's Watermelon Fruit Basket, Mom V's Antipasto Squares, Texas Caviar Bean Dip, Cole Slaw and Cucumber Salad.
Lunch was great, particularly the ribs, which were tender on the inside with a well-seasoned bark on the outside. I'm not a big rib eater, because I don't want sauce or spices stuck in my fingernails all day. (I can be girlie once in a while.) But this meat came off the bone very easily and I was really impressed how the spices soaked into the meat.
While in the oven, the ribs were stacked four tall in the baking pan. Every half hour, Dad had to take the slab that was on the bottom of the pan and move it to the top. Since the one at the bottom was the hottest, it created the most juices, so when it was moved to the top, all the juices would run down the stack to the drier racks below. This, undoubtedly, was the key to making sure the flavors spread evenly throughout the meat.
The Crazy-Long List of Seasonings
Dry rub:
MOP Sauce:
Ribs:
That night, Matt and I headed home thoroughly stuffed and bearing a ton leftovers. Saturday night was definitely as dinner-less night, but Sunday saw the need for some vegetables in our life. I warmed a few of the ribs in the oven at 350° for about 30 minutes, de-boned all the meat and sprinkled it over a well appointed green salad. The meat was even more tender and flavorful then the day before and some light Italian dressing drizzled over the top helped to re-activate the spices.
A great holiday was had by all, left with memories of ribs, extra helpings of mac salad and some very full bellies. But most importantly, it was best spent with family, friends and good food; just the way it should be.
Thursday, July 2, 2009
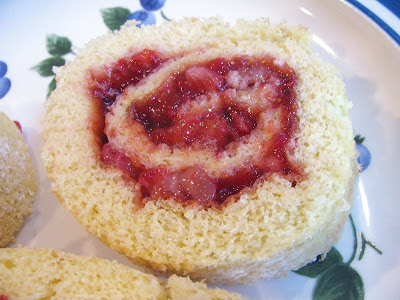
Test Kitchen #18: Strawberry Shortcake Jelly Roll
The mental journey that was taken during for this week's test kitchen in combination with the sudden arrival of summer heat was enough to make mush out of my already spongy brain. For some reason it's become increasingly difficult to come up with new ideas each week. Mostly because now that summer's finally here, I'm trying to think of things that can keep the oven off.
While out running/walking they other day (yes, running. Try to hold back your laughter.) I started to think about ice cream, which then in turn made me think of gelato. That could be fun! Homemade gelato on a hot summer afternoon would definitely be refreshing. When I got home, I emailed Dad about the idea and got us both started on some recipe research.
I arrived later than normal on Tuesday afternoon, having had a meeting and a few errands to run in the morning. Unfortunately, the research found that every recipe required the use of an ice cream maker in the final stages of prep. Since neither of us owned one, we tried to invent a way to rig up our own contraption, but realized this was going to be more trouble and time than it was worth.
I began to personally resent the ice cream maker. As a rule, I was taught that there is no room in your kitchen for a gadget or machine that can't perform at least three functions. (I'm looking at you avocado slicer. Really, people?! We need a dedicated gadget to perfectly slice our avocados?! Good Lord!) But really, why waste counter space, storage space and freezer space for something that gets used maybe twice a year. It's one of those appliances that always seems appealing while zapping items for your bridal registry. "Oooo. An ice cream maker! That'd be so much fun!" Then years later you're unearthing it from your basement or attic, just to turn to your partner and say, "Why the heck did we want this thing, again?"
But I digress.
So with Mom joining us on her first Tuesday off for summer vacation, she laid out all the cookbooks for us to find something new. I started paging through the Cooking Light Desserts book, looking for something that required only ingredients we already had in the house.
And that's when we landed on the Strawberry Shortcake Jelly Roll. We had all the ingredients, the oven only had to be on for ten minutes, and strawberries are a refreshing summer fruit.
This is actually really easy to make and I would definitely make it again. With Fourth of July right around the corner, it looked very patriotic on Mom's blueberry plates. My only change would be to find a way to make the yellow cake a little more moist. When Mom, Dad and I had a slice the cake was a little on the dry side. Later that night when Matt had it for dessert, the cake had gotten a little softer after the jam filling had a chance to soak in.
The issues with the cake could also have been due to the wacky calculations we had to go through with the ingredients. The recipe calls for a 15 x 10 inch jelly roll pan. Our pan was 12 x 16.5 inches, so with a bigger pan the batter would spread out too far and the cake would be thin. So my Dad, the engineer, takes out his calculator and determines that our pan is one and a quarter times bigger than the pan in the recipe. Then we had to multiply all the ingredients by 1.25 to get the right ratio for the batter. If you want to try this math problem at home, better to just get out the yellow pages, find the nearest gelato shop and take the rest of the afternoon off. A designer friend of mine tells me that there's a great place in Bridgeport near the beach.
Guess where I'm headed this weekend.
Ingredients:
4 cups quartered strawberries (about 1 1/2 pounds)
3/4 cup sugar, divided
Cooking spray
2/3 cup all-purpose flour
1 teaspoon baking powder
1/4 teaspoon salt
5 egg whites
3 egg yolks
2 teaspoons grated lemon rind
1 teaspoon vanilla extract
2 tablespoons powdered sugar
1 (10-ounce) jar strawberry jam
1/2 cup whipping cream
Orange rind strips (optional)
1. Combine the strawberries and 1/4 cup sugar in a medium bowl. Cover and chill 1 hour; stir occasionally.
2. Preheat oven to 400°.
3. Coat a 15 x 10-inch jelly-roll pan with cooking spray; line bottom of pan with wax paper. Coat wax paper with cooking spray.
4. Lightly spoon flour into a dry measuring cup; level with a knife. Combine flour, baking powder, and salt, stirring with a whisk. Set aside.
5. Place remaining 1/2 cup sugar, egg whites, and egg yolks in a large bowl; beat with a mixer at high speed until pale and fluffy (about 5 minutes). Stir in lemon rind and vanilla. Sift half of flour mixture over egg mixture; fold in. Repeat procedure with remaining flour mixture. Spoon batter into prepared pan; spread evenly.
6. Bake at 400° for 10 minutes or until cake springs back when touched lightly in center. Loosen cake from sides of pan; turn out onto a dishtowel dusted with powdered sugar. Carefully peel off wax paper; let cake cool 2 minutes. Starting at narrow end, roll up cake and towel together. Place, seam side down, on a wire rack; cool completely (about 1 hour). Unroll carefully; remove towel. Spread jam over cake, leaving a 1/2-inch border. Re-roll cake, and place, seam side down, on a platter. Cut into 8 slices.
7. Beat cream with a mixer at high speed until stiff peaks form. Serve strawberries and whipped cream with cake. Garnish with orange rind, if desired.
(Recipe and photo before the ingredients list courtesy of Cooking Light)
Notes: Save a few strawberries and add them to the filling so that you have some real fruit amongst the jam. For a more health friendly version, use sugar-free jam and skip the homemade heavy cream topping in favor of some fat-free Ready-Whip.